Always look at the date when you read an article. Some of the content in this article is most likely out of date, as it was written on
March 27, 2019. For newer information, see
our more recent articles.
Intro
Starting Windows 10 in Safe Mode is useful for diagnosing critical system issues but lacks the usability and function of a normal startup, so should only be used in an effort to troubleshoot problems that are not easily identified.
Windows 10 Safe Mode will start Windows in its most basic state, accessing a limited set of files and drivers. It is designed to help troubleshoot problems on your PC; if a problem is not reproducible in Safe Mode then you know the issue is very likely not hardware but instead is caused by a device driver, application, service, 3rd party software or potentially even Windows itself. While there are multiple variations of Safe Mode we recommend using “Safe Mode with Networking” but if you need standard Safe Mode for some reason the process of accessing it is almost the same.
This article will cover the different ways and reasons to access Safe Mode:
- Using the Start menu (Shift+Restart method)
- From the Settings application (Settings method)
- From the Sign-in screen (Sign-in method)
- From a blank or black screen (Boot interrupt method) – Use this if you are completely unable to access Windows desktop or sign-in screen
Note: If you currently use a PIN to access Windows 10 then during diagnostic mode you will only be able to login using the password you used to set up the account. The PIN will not grant access to Windows 10 in diagnostic mode.
The Shift+Restart method
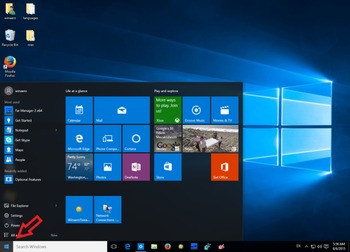
Let’s utilize the Start Menu for this one. Use your mouse to click on the “Start” button or “Windows Icon” in the bottom left corner of your screen, then click the power icon. While holding “Shift” on your keyboard please click the “Restart” button.
Step 1:
Start the computer normally and wait for everything to load
Step 2:
Locate the ‘Start’ button in the bottom left and click it

Step 3:
In the bottom left please select the power icon (circle with vertical line at the top) then while holding the “SHIFT” key on your keyboard click “Restart”

Step 4:
Success! Windows will restart; you should now see a screen offering three options: Continue, Troubleshoot and Turn off your PC. Select “Troubleshoot”

Step 5:
The next screen will provide two options, please select the second one labeled “Advanced options”

Step 6:
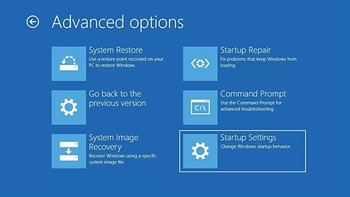
Numerous options appear on this screen, please select “Startup Settings”
Step 7:
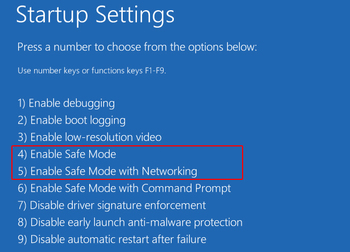
Now you only have one option “Restart” and we will select it but first, familiarize yourself with the different options

Step 8:
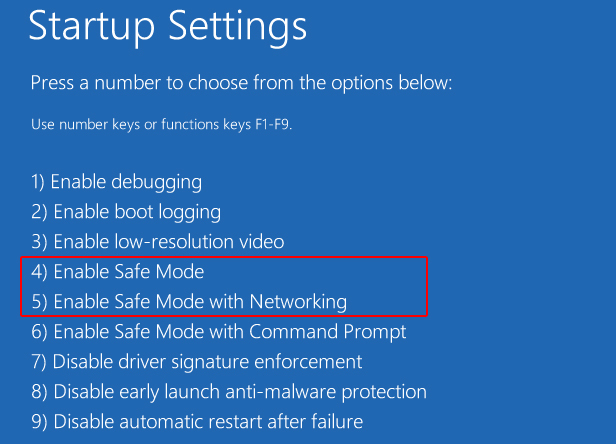
After you click “Restart” the system will reboot to a similar looking screen where you’ll see a list of options. Please select “Safe Mode with Networking” by pressing “5” or “F5” on your keyboard. You will not have mouse control at this point in the process

The Settings method
Let’s utilize the Start Menu for this one. Use your mouse to click on the “Start” button or “Windows Icon” in the bottom left corner of your screen then click the power icon. While holding “Shift” on your keyboard please click the “Restart” button.
Step 1:
Start the computer normally and wait for everything to load
Step 2:
Locate the ‘Start’ button in the bottom left and click it, select the “Settings” gear icon on the left
Step 3:
The Settings window will open. Select “Update & Security” then click the “Recovery” tab on the left. Under the Advanced startup heading please click “Restart now”. This will restart the computer into the recovery environment

Step 4:
Success! Windows will restart; you should now see a screen offering three options: Continue, Troubleshoot and Turn off your PC. Select “Troubleshoot”

Step 5:
The next screen will provide two options, please select the second one labeled “Advanced options”

Step 6:
Numerous options appear on this screen, please select “Startup Settings”
Step 7:
Now you only have one option “Restart” and we will select it but first, familiarize yourself with the different options

Step 8:
After you click “Restart” the system will reboot to a similar looking screen where you’ll see a list of options. Please select “Safe Mode with Networking” by pressing “5” or “F5” on your keyboard. You will not have mouse control at this point in the process

The Sign-in method
Now it’s time to utilize the Sign-in screen in order to boot into Safe Mode.
Step 1:
Start the computer normally but do not Sign-in
Step 2:
Locate the Power icon (circle with vertical line) and click it
Step 3:
Once the contextual menu pops up, while holding the “SHIFT” key, select “Restart”
Step 4:
Success! Windows will restart; you should now see a screen offering three options: Continue, Troubleshoot and Turn off your PC. Select “Troubleshoot”

Step 5:
The next screen will provide two options, please select the second one labeled “Advanced options”

Step 6:
Numerous options appear on this screen, please select “Startup Settings”
Step 7:
Now you only have one option “Restart” and we will select it but first, familiarize yourself with the different options

Step 8:
After you click “Restart” the system will reboot to a similar looking screen where you’ll see a list of options. Please select “Safe Mode with Networking” by pressing “5” or “F5” on your keyboard. You will not have mouse control at this point in the process

Boot interrupt method
If you are unable to access Windows in any way and your system is just booting to a black screen with or without a blinking cursor, this portion will guide you through accessing Safe Mode using the Boot interrupt method.
Step 1:
Power your system off by holding the power button down for at least 10 seconds until the system completely shuts off.
Step 2:
Press the physical power button to begin powering on your system.
Step 3:
As soon as you see an indication that Windows has started (usually indicated by a Windows logo) press and hold the power button until the system turns off again. Repeat this process until you see the Windows Recovery Environment (WinRE). This will likely take 3-4 attempts and if timed correctly should initiate the WinRE
Step 4:
If successful you should now see a screen offering three options: Continue, Troubleshoot and Turn off your PC. Select “Troubleshoot”

Step 5:
The next screen will provide two options, please select the second one labeled “Advanced options”

Step 6:
Numerous options appear on this screen, please select “Startup Settings”
Step 7:
Now you only have one option “Restart” and we will select it but first, familiarize yourself with the different options

Step 8:
After you click “Restart” the system will reboot to a similar looking screen where you’ll see a list of options. Please select “Safe Mode with Networking” by pressing “5” or “F5” on your keyboard. You will not have mouse control at this point in the process

Good to go?
Success! You were able to identify the underlying cause of the issue and are now ready to get back to work. You'll need to exit safe mode or you're gonna have a bad time. To do this, click the Windows logo (Start Menu) then type MSconfig and select "System Configuration", select the "Boot" tab and under boot options clear the box labeled "Safe Boot". Restart your system and you should arrive back at your login screen or desktop with a fully operational system. Get back to work (or play)!
Need help with your Puget Systems PC?
If something is wrong with your Puget Systems PC, we are readily accessible, and our support team comes from a wide range of technological backgrounds to better assist you!
Looking for more support guides?
If you are looking for a solution to a problem you are having with your PC, we also have a number of other support guides that may be able to assist you with other issues.
